
Rudders, scissors and other effective training tools
1. Identify your learning outcomes
It’s all about learning outcomes. These might sound boring. They’re not. These are your goals for what the session will achieve. Without them, you and your participants are rudderless!
Write them in terms of ‘Participants will be able to….’
Pro-tip: ‘understand is not a great verb to start writing a learning outcome – how will you know they’ve understood? Dig deeper by using more meaningful verbs like ‘show, apply, use, reflect’.
Example
Participants will be able to:
- Use the correct chemical cleaner to clean the machine
- Follow a work instruction step by step to clean the machine
2. Write a plan
Sounds obvious, but I’ve seen my fair share of densely packed 8-point Times New Roman PowerPoint slides with no visuals.
This tells me planning has been minimal – because if you haven’t planned, you babble at your participants and throw text-heavy PowerPoint presentations at them.
When you write a plan, keep it short and SMART. Start with the (no surprises here) learning outcomes.
Here’s a no-frills session plan download you can use as a template.
3. Focus on solutions
Take a leaf out of Cathy Moore’s book and come back to the central question, ‘what problem am I trying to solve with a training solution?’ Closely followed by, ‘is training the only solution?’
Often not, at least not in the traditional training sense. You may need a wrap-around learning solution instead.
Example
Jerry is struggling to follow and execute the procedure for machine shut down. His solution might be,
a) show him where to find the Standard Operating Procedures (SOPs)
b) have a buddy walk him through the process
c) complete an online learning module to consolidate the learning
d) ask him to train someone else to deepen his learning and
e) make a video SOP for the next person who needs to be training.
4. Bring concepts and skills to life
Use activities that give your trainees an experience. Get your participants to do something with the material. We have known for years that the flip-top head model of throwing a wall of information at people doesn’t work. Yet this model persists. Why?
Refer to points 1 and 2. I worked with an amazing tutor years ago at a language school. She reckoned the best tool in a tutor’s bag was a pair of scissors. When you cut up resources (think words, pictures, parts of a text document, emojis, questions on a card, anything) you can create activities that promote interaction and discussion.
Example
Download our example. And there are cool tools to create the same result online too. Check out #Mentimeter, #Wordwall and don’t be scared of the whiteboard functions in #Zoom and Teams. Or the breakout rooms!
5. Teach for transfer
Learning that stays in a training room somewhere stays in a training room somewhere and is useless in the long run. Be clear that your intention is for participants to take away bits of learning to use in the workplace and the real world. Build this into your plan. Get learners to tell you how they plan to take what they’ve learned forwards.
There’s no number 6- that’s it! We are approaching information dump status so I’m going to do something else useful when it comes to learning and chunk this down into a series of learning articles. See what I did there? See you in Part 2.
Sarah Balfour is a director and founder of Upskills. Follow her on LinkedIn or join our mailing list to keep up to date with her articles.
Resources
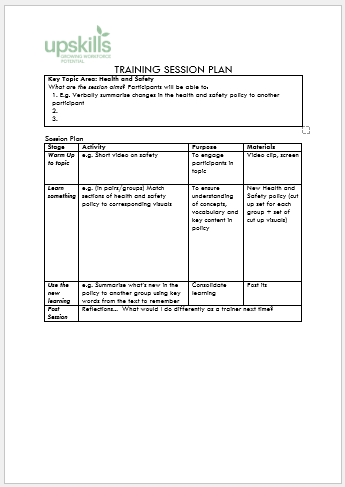
Download our no-frills training session plan to kick you off.
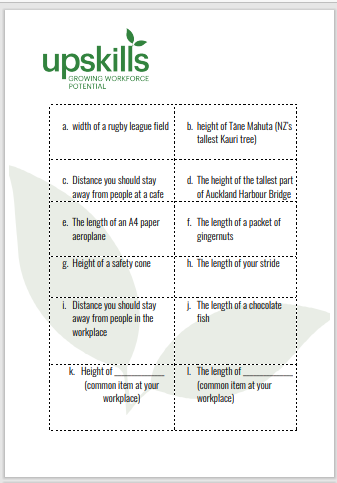
Get your team engaged! Download our example exercise to bring your training session to life.